The Boots
These boots were made for (when your fingers do the) walkin'
Each boot takes one bill, so you'll want to start with two dollars so you can make a pair of boots.
As with all these designs, try to start with relatively clean, crisp bills. It will go much easier. All folds should be sharply creased. It helps to go over the fold with a fingernail on a flat, hard surface.
(I used a Casio QV-10A digital camera to get the images. I've tried to reduce the resolution of the JPEGs to the very minimum required to minimize your download time, but it is still graphics intensive.)
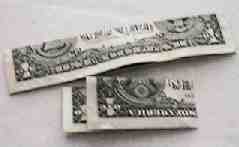
Start by folding the bill exactly in half lengthwise, shown at top.
Then, fold unevenly end-to-end, so the ends miss by about
one half of an inch.
 Ease open the end-to-end fold, (retain the crease, you'll reuse it
later), and make the lengthwise fold meet the
end-to-end fold line. (The bill's border should be out away from, not
in towards the fold.)
Ease open the end-to-end fold, (retain the crease, you'll reuse it
later), and make the lengthwise fold meet the
end-to-end fold line. (The bill's border should be out away from, not
in towards the fold.)
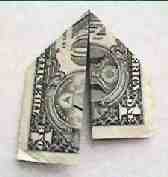 Now fold the other end in toward the same line.
Note how this looks. The white borders around the edge of the bill are away from the last two folds you've made.
I'll refer to the vertical line where the two meet as the
centerline in following steps.
 Fold both outer edges in toward the same centerline, from the same side.
(Okay, I screwed up the picture, the one on the left has
both folds, the one on the right has only one new fold.)
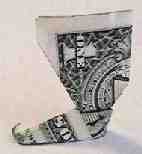
 Without unfolding anything, fold the shorter of the two
ends away from the centerline. Repeat this two more times until it
looks like the close-up picture shown. (Simple to do, difficult to
describe.) The idea here is to make that end smaller, so we
can tuck it in a tight space a couple of steps from now.
Without unfolding anything, fold the shorter of the two
ends away from the centerline. Repeat this two more times until it
looks like the close-up picture shown. (Simple to do, difficult to
describe.) The idea here is to make that end smaller, so we
can tuck it in a tight space a couple of steps from now.
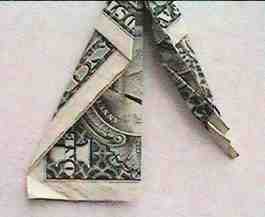
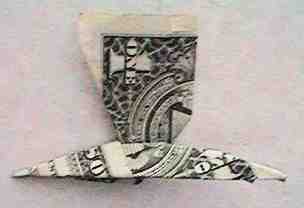
 Take the longer tab, and make a bend so that it passes underneath the
shorter end. The edge that was the far left edge in the previous
picture, and is now the horizontal line in the current view should
be at a ninety degree angle with the centerline.
Take the longer tab, and make a bend so that it passes underneath the
shorter end. The edge that was the far left edge in the previous
picture, and is now the horizontal line in the current view should
be at a ninety degree angle with the centerline.
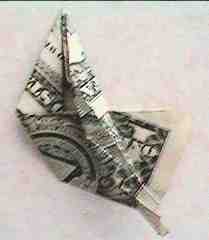
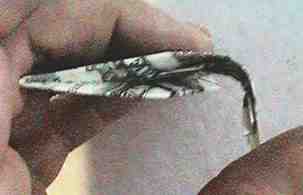
 If you refold the centerline fold, you're here. (This picture is rotated
relative to the previous picture. The centerline fold has become the top
edge of the lower/front portion of the boot.)
If you refold the centerline fold, you're here. (This picture is rotated
relative to the previous picture. The centerline fold has become the top
edge of the lower/front portion of the boot.)
 Now take the shorter, pointier loose end and wrap it around the heel
area of the boot.
Now take the shorter, pointier loose end and wrap it around the heel
area of the boot.
 This is the bottom view after tucking the short end in. (Okay, look at
the next picture for where to tuck it in.)
This is the bottom view after tucking the short end in. (Okay, look at
the next picture for where to tuck it in.)
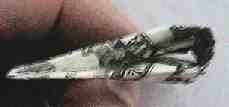
 Once tucked in, you are nearly done. (Optionally, curl up the toes for
the "elf boot" look, as shown here.)
Once tucked in, you are nearly done. (Optionally, curl up the toes for
the "elf boot" look, as shown here.)
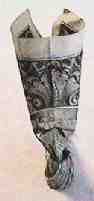 Open up the folded top, and stick your finger in. Just apply pressure
where needed to open up and round the upper portion of the boot. In
this rear view, you'll notice that you just have to "smoosh it"
towards the bottom rear to get it looking right.
Open up the folded top, and stick your finger in. Just apply pressure
where needed to open up and round the upper portion of the boot. In
this rear view, you'll notice that you just have to "smoosh it"
towards the bottom rear to get it looking right.
 That's all there is to it. If you want to make a symmetric pair, (shown)
alter which side is long and which is short from the second step, and
follow the same instructions, reverse left for right.
That's all there is to it. If you want to make a symmetric pair, (shown)
alter which side is long and which is short from the second step, and
follow the same instructions, reverse left for right.