The Bow Tie
This is something I learned in high school in the late seventies, so it has been around a while. I wasn't planning on putting on my web pages, since I thought everyone already knew this one. I was wrong. I get quite a few requests for this one, so here goes...
(Thanks to "Rogue" / "hispeed" for sending in this version. I had always done bow ties slightly differently, and this way is easier and simpler to describe.)
As with all these instructions, try to start with a relatively clean, crisp bill. It will make the process easier. All folds should be sharply creased. It helps to go over the fold with a fingernail on a flat, hard surface.
For your first attempt, use a one dollar bill, as the description and illustrations are based on the features of that bill. After you've done a couple you can try out different denominations.
|
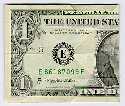
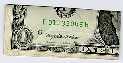
Fold the bill in half end-to-end with the portrait facing out (as shown at left). Without unfolding that, fold the bill in half top-to-bottom (as shown at right). | |
 Okay this is simple, but the description is rough: The folded bill now
has four layers. Gently peel back the top layer at the corner while
holding the other three layers together. This will force half of your
very first fold from the previous step to unfold. Help it to flatten out,
keeping it's crease in line with the second fold. Keeping it at this
angle, crease over the two 45 degree angles formed.
Okay this is simple, but the description is rough: The folded bill now
has four layers. Gently peel back the top layer at the corner while
holding the other three layers together. This will force half of your
very first fold from the previous step to unfold. Help it to flatten out,
keeping it's crease in line with the second fold. Keeping it at this
angle, crease over the two 45 degree angles formed.
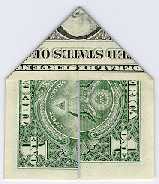 Flip the whole thing over and repeat this for the other side, remembering
to only lift the top layer. When you are finished both sides it
should resemble the illustration.
Flip the whole thing over and repeat this for the other side, remembering
to only lift the top layer. When you are finished both sides it
should resemble the illustration.
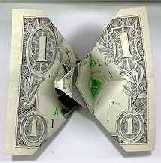
 Starting from the position of the previous step, close the two sides
like a book - keeping the last fold in place. (This will reverse the
fold that you caused to unfold in the previous step.) Turn the whole
thing over and repeat for the opposite side, created two steps
up.
Starting from the position of the previous step, close the two sides
like a book - keeping the last fold in place. (This will reverse the
fold that you caused to unfold in the previous step.) Turn the whole
thing over and repeat for the opposite side, created two steps
up.
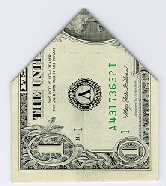
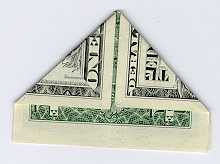
 Looking at the previous illustration, consider the two top edges shown
to be two sides of a triangle. Now we're going to make a fold along
the bottom line of that triangle. Splitting the two ends of the bill
apart, fold one end up to complete that triangle.
Looking at the previous illustration, consider the two top edges shown
to be two sides of a triangle. Now we're going to make a fold along
the bottom line of that triangle. Splitting the two ends of the bill
apart, fold one end up to complete that triangle.
 Turn the bill over and repeat the previous step for the other
side.
Turn the bill over and repeat the previous step for the other
side.
 | Lift one folded corner over 45 degrees to the centerline fold crease. (There are two layers here, only fold the top layer at this point.) Do the same for the other folded corner as shown at right. | 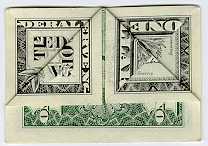 |
 Turn the whole thing over a repeat the previous step for the other side.
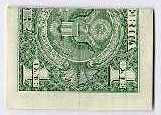
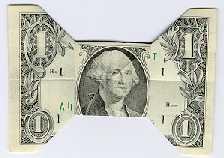
 If you carefully pull the two ends of the bill away from each other, with
the front of the bill facing you, it will look something like this. Note
that there's kind of a "point" in the middle of the portrait.
If you carefully pull the two ends of the bill away from each other, with
the front of the bill facing you, it will look something like this. Note
that there's kind of a "point" in the middle of the portrait.
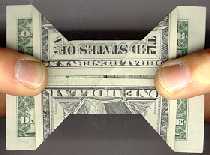 On the back side of the bill, you will need to hold your fingers over
the points shown to complete this step. (If you don't hold these
points together when you pull out the ends, the whole thing will come
unfolded.)
On the back side of the bill, you will need to hold your fingers over
the points shown to complete this step. (If you don't hold these
points together when you pull out the ends, the whole thing will come
unfolded.)
 Being sure to keep the folds closed as described in the previous
paragraph, gently pull the two ends apart. This will cause the point
(top illustration of this step, center of picture) to flatten out.
This will tend to create four new fold lines around the portrait.
When it is approximately flat, crease over these four folds and you're
done.
Being sure to keep the folds closed as described in the previous
paragraph, gently pull the two ends apart. This will cause the point
(top illustration of this step, center of picture) to flatten out.
This will tend to create four new fold lines around the portrait.
When it is approximately flat, crease over these four folds and you're
done.