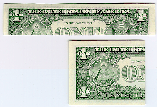
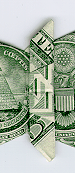
 Fold the bill precisely in half top-to-bottom, then unfold. Fold
the bill precisely in half left-to-right, then unfold.
Fold the bill precisely in half top-to-bottom, then unfold. Fold
the bill precisely in half left-to-right, then unfold.Butterfly
The Introduction:
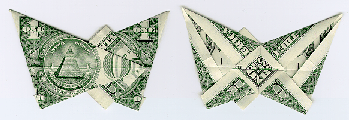
Somehow, I always pictured in my head that it would have to be possible to do a butterfly (pictured below), but it took me forever to come up with the fifth & sixth steps that appear below. When I finally did, I was quite surprised at the final appearance. In particular, the interesting symetrical pattern on the top of the wings came as a pleasant shock.
I know the remainder of this page is huge, but this one is very difficult to describe, and I thought it needed alot of high quality graphics to help you follow along.
Please note that this design requires precise folds to work.
The Instructions:
Get yourself a fairly new, crisp bill. Older "soggier" bills are much harder to work with.
The first few steps will involve folding the bill, and then unfolding it. These steps are to get creases in the bill. All of these folds will be reused, except one. When unfolding after the initial fold, do not attempt to flatten the bill again, just open it up enough to be able to perform the next step.
Of course in all the following diagrams, the old folds are flattened, but that is because I made the images on a flatbed scanner.
Fold the bill precisely in half top-to-bottom, then unfold. Fold
the bill precisely in half left-to-right, then unfold.
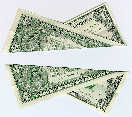 Fold the bill precisely from corner-to-corner diagonally, then unfold.
Repeat this fold for the other two diagonal corners.
Fold the bill precisely from corner-to-corner diagonally, then unfold.
Repeat this fold for the other two diagonal corners.
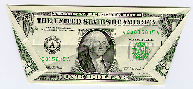 Fold both ends as shown. This odd angle fold is from the upper corner of the
bill to about 1/2 inch inside the lower corner on each side. Try to make the
folds symetrical. These folds will remain - do not unfold.
Fold both ends as shown. This odd angle fold is from the upper corner of the
bill to about 1/2 inch inside the lower corner on each side. Try to make the
folds symetrical. These folds will remain - do not unfold.
 Following the diagonal creases created two steps above, refold and re-unfold
along each diagonal. (This is to crease the end folds created in the previous
step.)
Following the diagonal creases created two steps above, refold and re-unfold
along each diagonal. (This is to crease the end folds created in the previous
step.)
 While the diagonal is held folded, fold and unfold along the "half
top-to-bottom" the two corners that have the end points of the diagonal
fold. (This is difficult to describe in writing - look at the picture!)
After these two creases are complete, open the diagonal fold and repeat this
step for the other diagonal fold. (An attempt
to make this clearer.)
While the diagonal is held folded, fold and unfold along the "half
top-to-bottom" the two corners that have the end points of the diagonal
fold. (This is difficult to describe in writing - look at the picture!)
After these two creases are complete, open the diagonal fold and repeat this
step for the other diagonal fold. (An attempt
to make this clearer.)
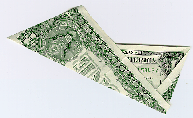
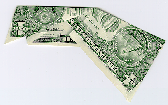
 Believe it or not, this picture shows the next fold (singular). Using all
the folds/creases created before, simply bring the left & right ends
together while "encouraging" the half left-to-right, both diagonals,
and the folds made in the previous step to re-fold. If you're doing it right,
it will start to look like the picture, but won't quite close. Holding the
half left-to-right and both diagonal fold creases closed, gently force the
center section of the bill to close. This will create four new folds
(automatically in the correct place if you don't let anything poke out the
wrong place). If anything extra is sticking out, don't close this fold.
Re-open slightly, tuck it back in, and try closing again. (This is quite
difficult to describe, but is not hard to do!)
Believe it or not, this picture shows the next fold (singular). Using all
the folds/creases created before, simply bring the left & right ends
together while "encouraging" the half left-to-right, both diagonals,
and the folds made in the previous step to re-fold. If you're doing it right,
it will start to look like the picture, but won't quite close. Holding the
half left-to-right and both diagonal fold creases closed, gently force the
center section of the bill to close. This will create four new folds
(automatically in the correct place if you don't let anything poke out the
wrong place). If anything extra is sticking out, don't close this fold.
Re-open slightly, tuck it back in, and try closing again. (This is quite
difficult to describe, but is not hard to do!)
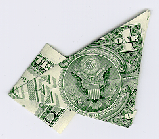
 Along the line between where the top/bottom edges intersect the diagonal
folds, make a new fold. (Look at the picture.) This will be the narrowest
point along the "wing". Do this on both sides of the center,
keeping the folds symetrical with each other.
Along the line between where the top/bottom edges intersect the diagonal
folds, make a new fold. (Look at the picture.) This will be the narrowest
point along the "wing". Do this on both sides of the center,
keeping the folds symetrical with each other.
 Unfold one of the folds made in the previous step. Parallel to the crease from
this fold, fold the "remainder" of the center in half. Do it again.
(These folds are tough to get tight since there are so many layers of paper
here.) This center portion ends up as a long, skinny "body" for the
butterfly.
Unfold one of the folds made in the previous step. Parallel to the crease from
this fold, fold the "remainder" of the center in half. Do it again.
(These folds are tough to get tight since there are so many layers of paper
here.) This center portion ends up as a long, skinny "body" for the
butterfly.
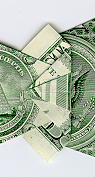
 Open both wings along their folds. The body should look like the image on
the left (on one side). Notice that portion of the body along the center
folds are slightly larger than along the edges of the bill. Fold the larger
portion tightly over the edges. Then twist a small amount of the end over in
the same direction. (This is what keeps the body portion from unfolding
itself.) It isn't too critical how you do this as long as the body stays
folded. (Sorry, this doesn't show up too well on the flatbed.)
Open both wings along their folds. The body should look like the image on
the left (on one side). Notice that portion of the body along the center
folds are slightly larger than along the edges of the bill. Fold the larger
portion tightly over the edges. Then twist a small amount of the end over in
the same direction. (This is what keeps the body portion from unfolding
itself.) It isn't too critical how you do this as long as the body stays
folded. (Sorry, this doesn't show up too well on the flatbed.)
 Fold the wings down again. You're basically done. You can "pinch"
the tips of the wings to get a slight rise and more pointed look. (No way to
show on a flatbed - fake it.)
Fold the wings down again. You're basically done. You can "pinch"
the tips of the wings to get a slight rise and more pointed look. (No way to
show on a flatbed - fake it.)