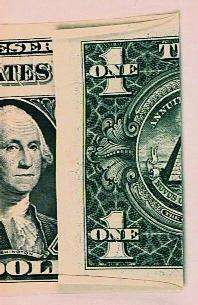
 Lay the bill on a flat surface, face up. Fold left and right sides inward
so that the edges of the bill form borders for the portrait.
Lay the bill on a flat surface, face up. Fold left and right sides inward
so that the edges of the bill form borders for the portrait.Picture Frame
(The Famous Americans Series)
The Corny Intro:
This series of collectables features portraits of such notable and historic Americans as Washington, Jefferson, Lincoln, Hamilton, Jackson, Grant, Franklin, McKinley, Cleveland, Madison, Chase, and Wilson. Each portrait is individually framed. Some are valued at over $50, while four of the series (discontinued in 1969) are valued between $1,000 and $100,000!
You will certainly want to collect the whole set of twelve, but you can start your collection with the father of our country, George Washington, for the special introductory price of only one dollar!
These hand-engraved, intaglio-printed portraits are created with the utmost care and quality control on the finest cotton bond paper made for years of enjoyment. Start your collection today!
(I said it was corny, but it gives you something to read while all the graphics are downloading.)
The Instructions:
Get yourself a fairly new, crisp bill. Older "soggier" bills are much harder to work with.
Lay the bill on a flat surface, face up. Fold left and right sides inward
so that the edges of the bill form borders for the portrait.
 While not necessary, folding a very small angle as shown will
help keep the next fold neat. If you don't do this, the edges will
want to "escape" from the next fold and poke out.
While not necessary, folding a very small angle as shown will
help keep the next fold neat. If you don't do this, the edges will
want to "escape" from the next fold and poke out.
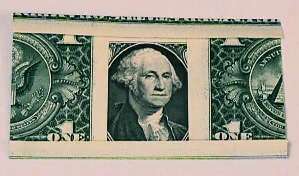 Fold top and bottom inward so that the edges form top and bottom borders for
the portrait. The bottom edge should fold along the white border of the
rear. The top fold should meet the top edge of the portrait.
Fold top and bottom inward so that the edges form top and bottom borders for
the portrait. The bottom edge should fold along the white border of the
rear. The top fold should meet the top edge of the portrait.
 Along the line separating the white border from the printing on the reverse
sides (now left and right of the portrait) fold both sides
back.
Along the line separating the white border from the printing on the reverse
sides (now left and right of the portrait) fold both sides
back.
These two areas will become the stand which will allow the portrait
to stand up like a picture frame.
 These last two folds aren't intended to lie flat, but should stay a little
more that 90 degrees, to hide the "stand" of the picture frame
from the front.
These last two folds aren't intended to lie flat, but should stay a little
more that 90 degrees, to hide the "stand" of the picture frame
from the front.
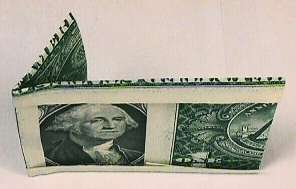
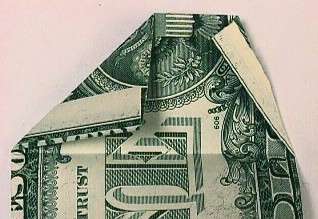 On each "wing" make two folds: a small fold on the bottom edge
and a large fold on the top edge.
On each "wing" make two folds: a small fold on the bottom edge
and a large fold on the top edge.
The top fold is simply to help hide the "wings" from the front.
The bottom fold is done at a slight angle, and will determine the angle at
which the portrait sits on a surface.
 Now make a second fold at a diagonal between the top edge of the bill
and the end to the bottom fold. (These folds aren't critical, but
help hide the rear edges when viewed from the front.)
Now make a second fold at a diagonal between the top edge of the bill
and the end to the bottom fold. (These folds aren't critical, but
help hide the rear edges when viewed from the front.)
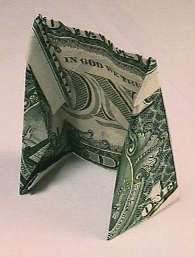 This is what the rear will look like when you've done both sides. Adjust
both of these "wings" so that they are hidden behind slightly,
and still hold the portrait upright.
This is what the rear will look like when you've done both sides. Adjust
both of these "wings" so that they are hidden behind slightly,
and still hold the portrait upright.
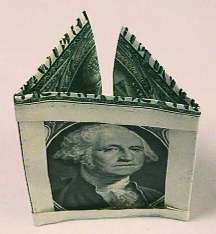
 When viewed from the front, this is about what it should look like.
Doing these with 5s, 10s, and old 20s is exactly the same.
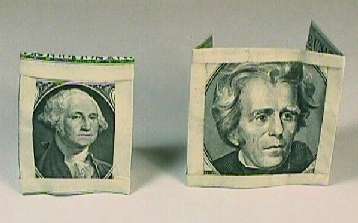 For the new 20s, 50s, etc., just adjust the initial fold points (around
the portrait area). The back (shown here without the "hiding" folds)
is asymetrical, but who cares?
For the new 20s, 50s, etc., just adjust the initial fold points (around
the portrait area). The back (shown here without the "hiding" folds)
is asymetrical, but who cares?