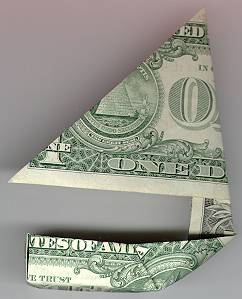
 Start by folding a corner in at a 45 degree
angle so that the side edge exactly meets the bottom edge.
Start by folding a corner in at a 45 degree
angle so that the side edge exactly meets the bottom edge.The sailboat requires two bills, one for the sail, one for the body of the boat.
(A problem with trying to explain this one is that the thing gets three dimensional at times, and I'm getting the pictures from a flatbed scanner. You are going to have to use a little more imagination on this one than on some of the others.)
Start by folding a corner in at a 45 degree
angle so that the side edge exactly meets the bottom edge.
 Fold the opposite side in so that it meets the first fold.
 |
Refold the longer side into the original fold twice. This section will end up becoming the "mast" of the sailboat. (At this point it starts to get difficult to try to keep the folds tight and neat since we're getting to four layers at the fold, but it is important to do the best you can.) | 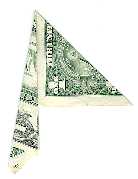 |
 At the end of the "mast", flatten
out the end of all the layered folds as shown. (This
really doesn't show up on the scans well. If you can't
see it from this picture, look at the next to get an idea of
where we're going.)
At the end of the "mast", flatten
out the end of all the layered folds as shown. (This
really doesn't show up on the scans well. If you can't
see it from this picture, look at the next to get an idea of
where we're going.)

For the flat section created above (not further up the mast), reverse fold along the mast folds created in the steps 2 & 3. This will create two "wings", one along either side of the mast. These end up being used later to attach the sail to the hull.
The sail is done. Easy, no?
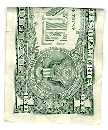
 Start with the second bill. Fold precisely in
half lengthwise, then unfold. Using the crease from this fold to
guide you, fold both corners of one end in to the centerline as
shown. These folds will later form the prow, and I'll refer to
them below as the prow folds. (For the less
nautically-inclined reader, "prow" refers to the forward
part of a ship's hull.)
Start with the second bill. Fold precisely in
half lengthwise, then unfold. Using the crease from this fold to
guide you, fold both corners of one end in to the centerline as
shown. These folds will later form the prow, and I'll refer to
them below as the prow folds. (For the less
nautically-inclined reader, "prow" refers to the forward
part of a ship's hull.)
 |
Unfold the previous folds, but retain the creases created, they will be needed later. Now fold the bill precisely in thirds lengthwise. (It takes a little practice to be able to be able to eye-ball this fold, but it comes with practice.) These folds will separate the bottom from the sides of the hull, and I'll refer to them below as the hull folds. | 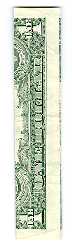 |
 Unfold the previous folds, but again, retain
the creases created. Fold the bill in half end-to-end and crease
hard. This fold will separate the stern from the bottom of the
hull. I'll refer to it below as the stern fold. (For you
'land-lubbers', the "stern" is the rear part of a ship or
boat.)
Unfold the previous folds, but again, retain
the creases created. Fold the bill in half end-to-end and crease
hard. This fold will separate the stern from the bottom of the
hull. I'll refer to it below as the stern fold. (For you
'land-lubbers', the "stern" is the rear part of a ship or
boat.)
 Refold the prow folds. Re-crease the hull folds
up so that each of the sides is about 90 degress from the center
('U'-shaped.) Re-crease the stern fold. Note that the hull folds
and the stern folds are opposing. So...
Refold the prow folds. Re-crease the hull folds
up so that each of the sides is about 90 degress from the center
('U'-shaped.) Re-crease the stern fold. Note that the hull folds
and the stern folds are opposing. So...
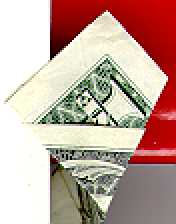
 Force the hull and stern folds to form the corners
of a box, as shown here (or as well as can be shown on a flatbed
scanner). For the whole scheme to work out, both of these
intersecting folds have to fold in toward the center. As shown,
the portion of the bill between the prow and the stern fold is
open, while the remainder of the bill along the hull folds becomes
a flat tab sticking up.
Force the hull and stern folds to form the corners
of a box, as shown here (or as well as can be shown on a flatbed
scanner). For the whole scheme to work out, both of these
intersecting folds have to fold in toward the center. As shown,
the portion of the bill between the prow and the stern fold is
open, while the remainder of the bill along the hull folds becomes
a flat tab sticking up.
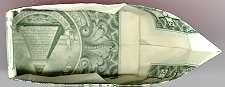
 Okay, that flat tab is now folded over the
stern into the interior of the boat. As shown, make this fold
so that it forces a little of both gunwales to wrap down.
("Gunwale" = the upper edges of the hull's sides.)
The width of the white border of the bill is about right for
the overlap. Don't try to fix the gunwales yet. Take the
remainder of the 'flat tab' and force it to conform to the
inside of the stern, and along the deck. Although it's
slipping in the picture, you want the end of the tab to be
behind the edges created by the prow folds.
Okay, that flat tab is now folded over the
stern into the interior of the boat. As shown, make this fold
so that it forces a little of both gunwales to wrap down.
("Gunwale" = the upper edges of the hull's sides.)
The width of the white border of the bill is about right for
the overlap. Don't try to fix the gunwales yet. Take the
remainder of the 'flat tab' and force it to conform to the
inside of the stern, and along the deck. Although it's
slipping in the picture, you want the end of the tab to be
behind the edges created by the prow folds.
(At this point, I would normally insert the sail and continue. After you've done a few, you probably will too. For clarity, both in the illustrations and instructions, I will continue to complete the hull. At the end I'll describe how to go back to insert the sail.)
Okay, this is fairly easy to do, but really difficult to describe. That's why there are three pictures here.
You're going to make the prow folds meet the gunwales. To do this, take a hold of the prow fold in one hand where it meets the side, and take hold of gunwale about one half an inch (a little over a centimeter for some of you) away in the other hand.
 Force an 'S' bend to form at that point and angle
the prow line to the gunwale. The prow fold should line up with
the top of the printing (not the edge of the bill) at the top.
Also, the direction of the S bend should force the prow fold to
the inside of the boat.
Force an 'S' bend to form at that point and angle
the prow line to the gunwale. The prow fold should line up with
the top of the printing (not the edge of the bill) at the top.
Also, the direction of the S bend should force the prow fold to
the inside of the boat.
Use the S bend to lead you to create two folds that form a 'V', where the two folds meet at the hull fold.
(Look at the first picture until the instructions makes sense, or until you figure it out on your own, which ever happens first. I'm a programmer, not a documentation specialist!)Once you've got those folds, you form the gunwales by folding the edges over from prow to stern. (Remember back two steps? We wrapped the 'flat tab' over a little. Here's where it comes in handy.)
Since so many people seem to be having problems with this part, I've added some more pictures.
 The second and third pictures show the
outside and inside after the gunwale fold.
The second and third pictures show the
outside and inside after the gunwale fold.
 Sorry, but this is the best picture I could
come up with on a flatbed scanner.
Sorry, but this is the best picture I could
come up with on a flatbed scanner.
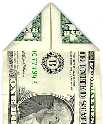
 This picture shows the completed hull from the
top. Both gunwales have been completed.
This picture shows the completed hull from the
top. Both gunwales have been completed.
If you get it just right, it looks pretty 'ship-shape'.
If you didn't get this right the first time, go back to the previous
step and fix the prow-fold to gunwale points. They should be even
and make the side match up properly. They also hold most everything
together.
 Here's the finished product.
("What??? Didn't you skip something?!?")
No, actually the only instruction for attaching the sail to the hull is to
unfold the prow folds to allow the 'wings' at the base of the mast to slide
under. Then just push the prow folds back in place. As I mentioned above,
I usually insert the sail as I'm going along, but it's simple enough to do
afterward.