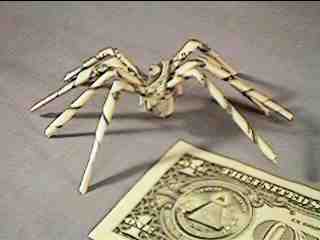
| The Spider |
| The Spider |
As with all these designs, try to start with relatively clean, crisp bills. It will go much easier. All folds should be sharply creased. It helps to go over the fold with a fingernail on a flat, hard surface.
The spider requires five bills: four for the legs, and one to wrap the body.
(This is the first one of these I've put up with this type of image. I used a Casio QV-10A digital camera to get the images. I've tried to reduce the resolution of the JPEGs to the very minimum required to minimize your download time, but it is still quite graphics-heavy.)
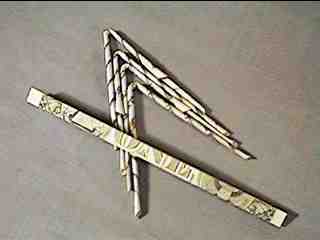 Start by rolling up four of the bills into tight tubes (as explained
here), then fold each one in half
end-to-end.
Start by rolling up four of the bills into tight tubes (as explained
here), then fold each one in half
end-to-end.
Then fold the remaining bill exactly in half lengthwise three times.
Now you have the pieces.
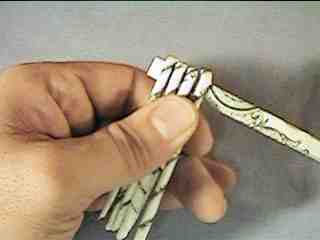 Take each of the four leg tubes and drape them over the flat folded bill
near the end. As shown, leave a little bit hanging out the end, as seen
to the left in the picture.
Take each of the four leg tubes and drape them over the flat folded bill
near the end. As shown, leave a little bit hanging out the end, as seen
to the left in the picture.
 This is a close-up of the four legs draped over the flat folded bill.
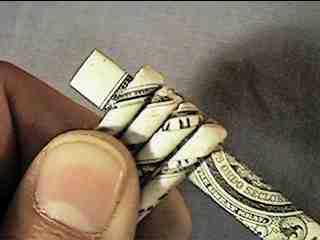
While holding the leg ends tightly together, tightly
wrap the flat bill around the whole thing one and a half times.
This is a close-up of the four legs draped over the flat folded bill.
While holding the leg ends tightly together, tightly
wrap the flat bill around the whole thing one and a half times.
 This picture shows the flat bill wrapping over and trapping the
end poking out from the left on the picture above.
Make sure that this wrap is very tight, that the legs are
squeezed tightly together, or you won't be able to make the body
stay together (described later).
This picture shows the flat bill wrapping over and trapping the
end poking out from the left on the picture above.
Make sure that this wrap is very tight, that the legs are
squeezed tightly together, or you won't be able to make the body
stay together (described later).
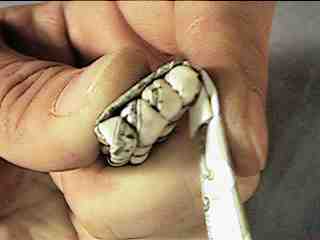
 This is a pretty good, tight wrap. If it doesn't look like this, don't
continue. Work on it until it is solidly tight.
This is a pretty good, tight wrap. If it doesn't look like this, don't
continue. Work on it until it is solidly tight.
 Making sure to hold the wrap tightly closed, turn the whole thing over
in your hands. While squeezing the side tightly together, kink each
of the legs outward, four on each side.
Making sure to hold the wrap tightly closed, turn the whole thing over
in your hands. While squeezing the side tightly together, kink each
of the legs outward, four on each side.
 Fold a ninety degree turn into the flap over the end, and then fold the
remainder down between the split legs. (Just look at the picture.)
Fold a ninety degree turn into the flap over the end, and then fold the
remainder down between the split legs. (Just look at the picture.)
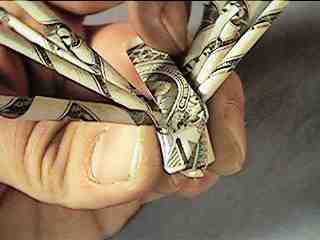
 After going between the legs (top of this picture), wrap the flap
around the other end and around under.
After going between the legs (top of this picture), wrap the flap
around the other end and around under.
 Okay, this is a rotten picture, but... Take the remainder of the tab
(bottom of previous picture, middle-to-right this picture), and tuck
it between the legs and the outer wrap on the side that the outer
wrap is only one deep.
Okay, this is a rotten picture, but... Take the remainder of the tab
(bottom of previous picture, middle-to-right this picture), and tuck
it between the legs and the outer wrap on the side that the outer
wrap is only one deep.
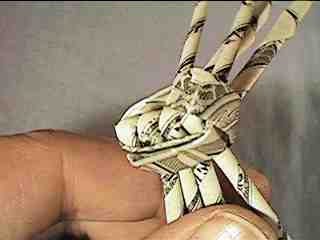
 If all has gone well up to now, the body will hold itself together
based on the previous step. For each of the eight legs, bend back
toward the body.
If all has gone well up to now, the body will hold itself together
based on the previous step. For each of the eight legs, bend back
toward the body.
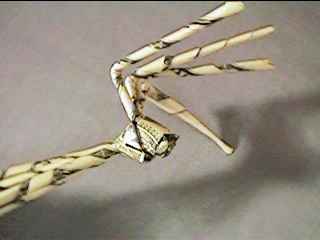
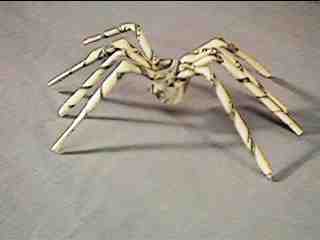
That's about it. Here's the finished product:
There are two keys to having it look nice and stay together:
These things are really popular, but every once in a while you're likely to have a bad reaction. (I once made one for a tip, and popped it up on the bar. When the girl turned around and saw it, for just that split second, it looked real. She let out a scream at the top of her lungs, and must have jumped three feet straight into the air. She was slightly arachniphobic. Oops.)